Now that the project is set up, cleaned up, and pushed to GitHub (as covered in my previous post), it’s time to prepare the ground for building. Before jumping into individual pages and components, I’ll focus on setting up global styling, fonts, and images for both Next.js and React Router. These are shared across the entire app, so getting them right now will save time and help maintain consistency later. Since I’m still learning both frameworks, this will also be a great opportunity to explore how each one handles these essentials.
Images
In Next.js, the documentation recommends storing images in the public folder.
With React Router, I haven’t found any specific guidance on where to store images. You can place them either in the public folder or inside the app folder within the relevant component’s directory.
I decided to use a mix of both:
- For images related to specific components, I’ll store them inside the
appfolder, within the corresponding component folder. - For all other images, I’ll place them in the
publicfolder.
Fonts
For TartarusInsight.com, I use two fonts: Caesar Dressing for headings and Poppins for the rest of the text. Both fonts are available on Google Fonts.
Adding Google Fonts in Next.js
Next.js makes it easy to import Google Fonts.
In the layout.tsx file, I replace the default Geist and Geist_Mono fonts with Caesar Dressing and Poppins.
The updated code in layout.tsx will look like this:
// nextjs > app > layout.tsx
import type { Metadata } from "next";
import { Caesar_Dressing, Poppins } from "next/font/google";
import "./globals.css";

const caesarDressing = Caesar_Dressing({
  variable: "--font-caesar-dressing",
  weight: '400', // we specify the weight because the font isn't variable
  subsets: ["latin"],
});

const poppins = Poppins({
  variable: "--font-poppins",
  weight: ['400', '700'], // we specify the weight because the font isn't variable
  subsets: ["latin"],
});

export const metadata: Metadata = {
  title: "Tartarus Insight",
  description: "Trapped in the abyss of business struggles? Harness the Oracle's wisdom to ascend from struggle to success.",
};

export default function RootLayout({
  children,
}: Readonly<{
  children: React.ReactNode;
}>) {
  return (
    <html lang="en">
      <body
        className={`${caesarDressing.variable} ${poppins.variable} antialiased`}
      >
        {children}
      </body>
    </html>
  );
}
Since Caesar Dressing and Poppins aren’t variable fonts, we need to specify the weights manually.
In the globals.css file, we add some CSS rules to apply Caesar Dressing to headings and Poppins to the rest of the text:
/* nextjs > app > globals.css */
@import "tailwindcss";

h1, h2, h3, h4, h5, h6 {
    font-family: var(--font-caesar-dressing);
}

body {
    font-family: var(--font-poppins);
}I used the CSS variable approach because I know all the headers will use Caesar Dressing.
With the other method that Next.js offers, you’d need to add a className to each heading tag individually, which gets annoying.
The font documentation for Next.js is excellent overall. It took me a little while to figure out how to use multiple fonts, but the solution was right there—It just took a little digging to find.
Adding Google Fonts in React Router
In React Router, there’s a special function called links, which helps you render <link> tags inside the <head> of your HTML.
In the root.tsx file, you’ll already see the default links function defined:
// react-router > app > root.tsx
export const links: Route.LinksFunction = () => [
  { rel: "preconnect", href: "https://fonts.googleapis.com" },
  {
    rel: "preconnect",
    href: "https://fonts.gstatic.com",
    crossOrigin: "anonymous",
  },
  {
    rel: "stylesheet",
    href: "https://fonts.googleapis.com/css2?family=Inter:ital,opsz,wght@0,14..32,100..900;1,14..32,100..900&display=swap",
  },
];This code imports the Inter font from Google Fonts.
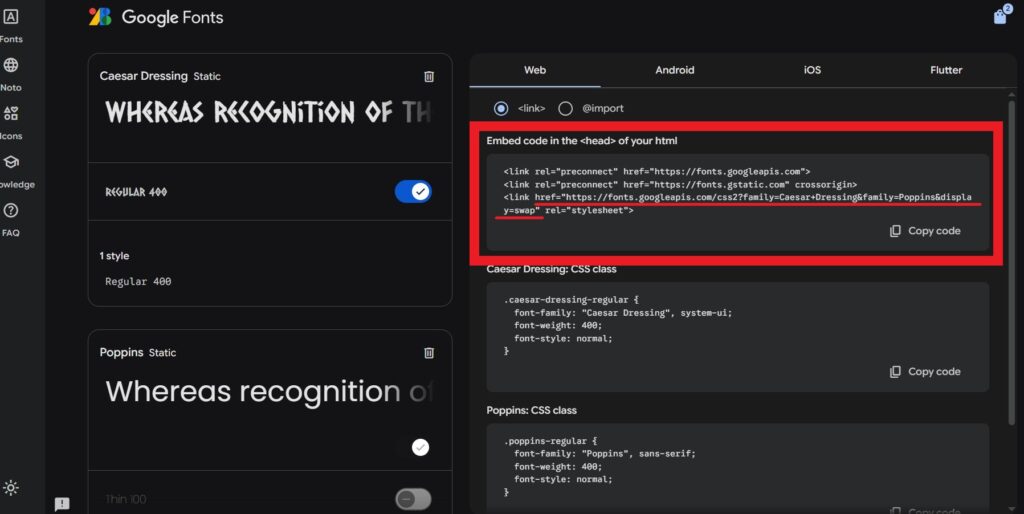
If you go to the Google Fonts website and select your fonts, you’ll see an embed section that shows the <link> tags you need to add to your <head>.

You’ll notice there are 3 <link> tags. We already have the first two in our code—we just need to update the href of the third one to include our selected fonts. After that, the links function will look like this:
// react-router > app > root.tsx
export const links: Route.LinksFunction = () => [
  { rel: "preconnect", href: "https://fonts.googleapis.com" },
  {
    rel: "preconnect",
    href: "https://fonts.gstatic.com",
    crossOrigin: "anonymous",
  },
  {
    rel: "stylesheet",
    href: "https://fonts.googleapis.com/css2?family=Caesar+Dressing&family=Poppins&display=swap",
  },
];Now, let’s create the necessary CSS rules in the app.css file to apply Caesar Dressing to headers and Poppins to body text:
/* react-router > app > app.css */
@import "tailwindcss";

h1, h2, h3, h4, h5, h6 {
  font-family: "Caesar Dressing", system-ui;
  font-weight: 400;
  font-style: normal;
  font-size: 40px;
}

body {
  font-family: "Poppins", sans-serif;
  font-weight: 400;
  font-style: normal;
}At first, I struggled to figure out how to add Google Fonts in React Router. I assumed the framework had a specific method, similar to Next.js. But the issue wasn’t the framework—it was me.
Turns out, React Router’s approach is actually simpler and more straightforward!
Conclusion
Next.js offers a built-in way to handle Google Fonts with great documentation, while React Router gives you the flexibility to do it the classic way.
Personally, I prefer the React Router approach because it makes it easy to use other font providers like Bunny Fonts in the same way. Using a different font provider in a Next.js project is a bit trickier, but their documentation is excellent and explains how to add a <link> tag manually.
What’s Next?
Now that the fonts are in place, I’m ready to move on to the actual pages and Now that the fonts are in place, I’m ready to move on to the actual pages and components. I’ll start by focusing on the home page layout and core components.
You can check out the Git repo here.


Leave a Reply