After building my AI-powered app using both Next.js and React Router, the next step is to get it online. For hosting, I decided to go with Hetzner, mainly because they offered a generous €20 free credit. Perfect for testing purposes!
You can get €20 in free credit by signing up for Hetzner using Coolify’s affiliate link!
You’ll need to add a payment method in the process but you’ll not be charged.
By doing this, you’re also supporting Coolify. An awesome open source project that makes self-hosting easy.
When it comes to deploying apps like these on a VPS, you generally have three options:
- Coolify – an open-source, self-hosted platform that brings many of the conveniences you’d find in platforms like Vercel, but without the vendor lock-in. You can connect your Git repository, deploy updates automatically and more.
- Docker – allows you to package your application together with all its dependencies into a single unit, called a container. This helps ensure that your app runs the same way across development, testing, and production environments.
- Manual Setup – the most flexible but also the most complex. You’ll configure everything yourself. From setting up Node.js and Nginx, to managing your app’s process with something like PM2. It gives you total control but requires more maintenance and time.
Each method has its pros and cons, and depending on your comfort level and needs, one may suit you better than the others. In this post, I’ll walk you through each approach and share how I hosted my app using Hetzner.
Deploying with Coolify
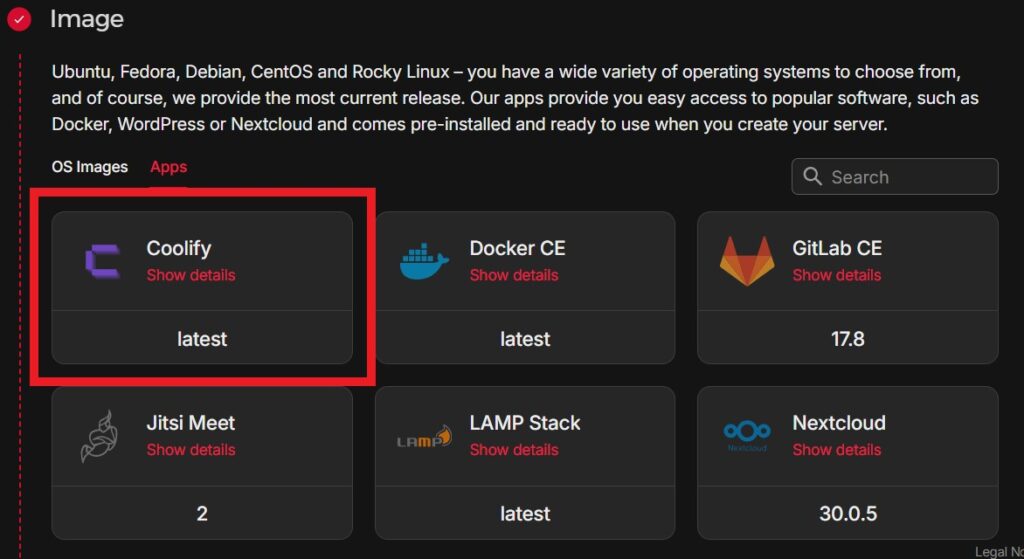
Installing and running Coolify on Hetzner is pretty easy. You can use an image that lets you create a server with Coolify preinstalled.
If you’re using a VPS that doesn’t offer this kind of simplified setup, you can still install Coolify easily after creating your server by running the following command:
curl -fsSL https://cdn.coollabs.io/coolify/install.sh | bash
# If you're not logged in as the root user, run the script with sudo
curl -fsSL https://cdn.coollabs.io/coolify/install.sh | sudo bashThe process of deploying both the Next.js and React Router apps is very similar. The only difference is in the Build Pack selection.
For Next.js, you choose Nixpacks as the Build Pack.
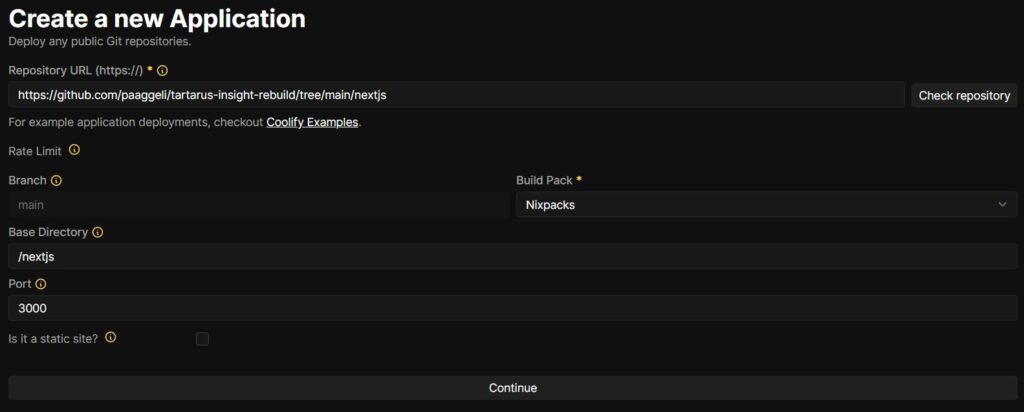
You can also choose Dockerfile as the Build Pack, like we do with React Router, if you have a Dockerfile.
For React Router, you choose Dockerfile as the Build Pack.
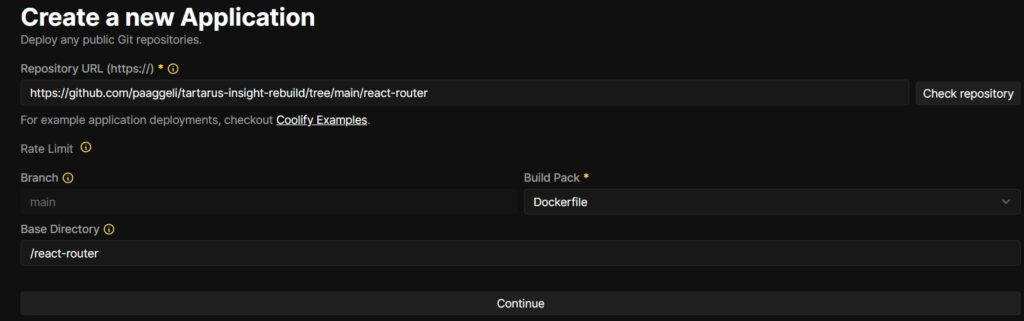
If you created your React Router app using:
npx create-react-router@latest my-react-router-appa Dockerfile is already included, so you don’t need to configure anything extra.
I only ran into a small issue when deploying the React Router version. I had accidentally added the package-lock.json file to .gitignore, but it was needed for a successful deployment. After committing it back into the repository and redeploying, everything worked as expected.
Deploying with Docker
Another way to deploy both the Next.js and React Router apps is by using Docker. Docker allows you to package your application along with all its dependencies into a single container.
In this setup, Docker will be used to run each app in its own container, and we’ll use Nginx as a reverse proxy to route incoming traffic to the correct container based on the request path. For example, traffic to / can go to the Next.js container, while traffic to /reactrouter can go to the React Router container.
Installing Docker Desktop
The first thing I did was download Docker Desktop. It’s an app that gives you a graphical interface to manage your Docker environment. You can easily see what images you have, which containers are running, and manage them with just a few clicks. It also comes with a CLI tool, so you can run Docker commands from your terminal.
Creating Docker Images
After installing Docker Desktop, I created Docker images for both of my apps.
To build a Docker image, you need a Dockerfile. With React Router, the Dockerfile is included automatically when you create the project. However, for Next.js, you need to create one manually. Fortunately, the official documentation points to a ready-made example on GitHub. I downloaded that file and placed it in the root of my Next.js project.
Making Config Changes Before Building
Before building the Docker images, I had to tweak some config files to make sure everything worked correctly in a production environment.
For Next.js, I added this line to next.config.ts to enable the standalone output mode (which is required for Docker deployment):
import type { NextConfig } from "next";

const nextConfig: NextConfig = {
  /* config options here */
  output: 'standalone',
};

export default nextConfig;For the React Router app, I updated react-router.config.ts and vite.config.ts to support running the app from a subpath (http://135.181.25.150/reactrouter).
// react-router.config.ts
import type { Config } from "@react-router/dev/config";

export default {
  // Config options...
  // Server-side render by default, to enable SPA mode set this to `false`
  ssr: true,
  basename: "/reactrouter",
} satisfies Config;


// vite.config.ts
import { reactRouter } from "@react-router/dev/vite";
import tailwindcss from "@tailwindcss/vite";
import { defineConfig } from "vite";
import tsconfigPaths from "vite-tsconfig-paths";

export default defineConfig({
  base: "/reactrouter/",
  plugins: [tailwindcss(), reactRouter(), tsconfigPaths()],
});Building the Docker Images
Once the Dockerfiles and config files were ready, I built the images.
In the root of the Next.js project, I ran:
docker build -t paaggeli/nextjs . In the root of the React Router project, I ran:
docker build -t paaggeli/reactrouter . Note:
paaggeliis my Docker Hub username. This is important. If the image name doesn’t match your Docker Hub username, you won’t be able to push it later.
Pushing to Docker Hub
To easily transfer the images to my VPS, I created a free account on Docker Hub. Think of it like GitHub, but for Docker images.
Before pushing, I logged in from the terminal:
docker loginThen I pushed both images:
docker push paaggeli/nextjs
docker push paaggeli/reactrouterNow that the images are stored on Docker Hub, I was ready to set up the VPS and pull them down.
On the VPS Side
Once Hetzner created my Ubuntu server, I connected to it using SSH. The first thing I did was update and upgrade the system to make sure everything was up to date.
sudo apt update
sudo apt upgradeInstalling Nginx
To install Nginx, I ran the command.
sudo apt install nginxAfter the installation, I checked if it was working by typing the server’s IP address into my browser.
If it didn’t load, it usually meant that Nginx didn’t start automatically. In that case, I manually started the service and checked again.
sudo systemctl start nginx
sudo systemctl enable nginxInstalling Docker
Next, I installed Docker.
sudo apt install -y docker.io
sudo systemctl enable docker
sudo systemctl start dockerAfter it was set up and running, I logged into Docker Hub from the server so I could access the images I previously pushed.
docker loginThen I used the pull command to download both app images to the VPS.
docker pull paaggeli/nextjs:latest
docker pull paaggeli/reactrouter:latestOnce the images were on the server, I started the containers to get the apps up and running.
docker run -d -p 3000:3000 --name nextjs paaggeli/nextjs:latest
docker run -d -p 3001:3000 --name reactrouter paaggeli/reactrouter:latestConfiguring Nginx for the Containers
With the containers running, the final step was to configure Nginx to act as a reverse proxy and route traffic to the correct app.
I created a new Nginx config file,
sudo nano /etc/nginx/sites-available/webappswith the necessary routing rules,
server {
listen 80;
server_name 135.181.25.150;
location /reactrouter { # For React Router app
proxy_pass http://localhost:3001;
proxy_http_version 1.1;
proxy_set_header Upgrade $http_upgrade;
proxy_set_header Connection 'upgrade';
proxy_set_header Host $host;
proxy_set_header X-Real-IP $remote_addr;
proxy_set_header X-Forwarded-For $proxy_add_x_forwarded_for;
proxy_set_header X-Forwarded-Proto $scheme;
proxy_cache_bypass $http_upgrade;
proxy_redirect off;
}
location / { # For Next.js app
proxy_pass http://localhost:3000;
proxy_http_version 1.1;
proxy_set_header Upgrade $http_upgrade;
proxy_set_header Connection 'upgrade';
proxy_set_header Host $host;
proxy_set_header X-Real-IP $remote_addr;
proxy_set_header X-Forwarded-For $proxy_add_x_forwarded_for;
proxy_set_header X-Forwarded-Proto $scheme;
proxy_cache_bypass $http_upgrade;
}
}and deleted the default one to avoid conflicts.
sudo rm -rf /etc/nginx/sites-available/default
sudo rm -rf /etc/nginx/sites-enabled/defaultNow, I need to create a symlink for the config file I created:
sudo ln -s /etc/nginx/sites-available/webapps /etc/nginx/sites-enabled/Then I restarted Nginx to apply the changes.
sudo nginx -t # Test is the config file has no errors
sudo systemctl restart nginxNow, visiting http://135.181.25.150 shows the Next.js app, and http://135.181.25.150/reactrouter loads the React Router app.
Problems I Encounter
I ran into a few issues while deploying the apps, mainly because I chose to host them on subpaths rather than assigning a separate domain or subdomain to each app. This approach introduced problems with loading assets like images, styles, and JavaScript files.
For the React Router app, which is served from the subpath http://, I was able to resolve the issues by updating the relevant configuration files (135.181.25.150/reactrouterreact-router.config.ts and vite.config.ts).
However, deploying the Next.js app under a subpath like http:// proved to be more difficult. Although I managed to fix most asset-related issues by adjusting the Next.js configuration, background images that was set by using Tailwind’s arbitrary value syntax, like 135.181.25.150/nextjsbg-[url('/images/pattern-marble.webp')] did not work correctly.
Unlike React Router, Next.js didn’t automatically rewrite the URLs to include the subpath (e.g., to /nextjs/images/pattern-marble.webp). Fixing this would have required manually refactoring all background image paths.
Since this project is primarily a comparison between frameworks, I decided not to spend more time on that issue and instead deployed the Next.js app at the root path: http://.135.181.25.150
Manually Deploying with Nginx and PM2 on a VPS
With this method, we need to set up the server ourselves. Most VPS providers offer images of various operating systems like Ubuntu, which you can install easily. But after installing the OS, you’ll need to configure the server to run your apps.
I connected to the server via SSH and ran the following commands to update the system:
sudo apt update
sudo apt upgradeAfter that, the initial setup steps are the same for both the Next.js and React Router versions, since both are based on Node.js:
- Install Node.js (using nvm)
- Install Nginx (used as a reverse proxy)
- Move the web apps to the server (using
git clone) - Install PM2 (globally)
Installing Node.js
To install Node.js, I first installed nvm (Node Version Manager), which is a tool for installing and managing multiple versions of Node.js on the same machine.
I used the following command to install nvm:
curl -o- https://raw.githubusercontent.com/nvm-sh/nvm/v0.40.3/install.sh | bashAfter installing, I ran the following commands to start using nvm immediately:
export NVM_DIR="$HOME/.nvm"
[ -s "$NVM_DIR/nvm.sh" ] && \. "$NVM_DIR/nvm.sh" # This loads nvm
[ -s "$NVM_DIR/bash_completion" ] && \. "$NVM_DIR/bash_completion" # This loads nvm bash_completionOtherwise, I would’ve needed to close and reopen the terminal.
Then, I installed the latest LTS (Long-Term Support) version of Node.js using:
nvm install --ltsInstalling Nginx
To install Nginx, I used:
sudo apt install nginxYou can now type the server’s IP address into your browser to check if Nginx is running.
If it doesn’t load, Nginx may not have started automatically after installation. Try running the following commands, then refresh your browser to check again.
sudo systemctl start nginx
sudo systemctl enable nginxCreating an Nginx Config
I created a new Nginx config file in /etc/nginx/sites-available/ and named it webapps. I also deleted the default config.
I created the file using:
sudo nano /etc/nginx/sites-available/webappsThen, I added the following configuration to it:
server {
listen 80;
server_name 91.99.146.50;
location /reactrouter { # For React Router app
proxy_pass http://localhost:3001;
proxy_http_version 1.1;
proxy_set_header Upgrade $http_upgrade;
proxy_set_header Connection 'upgrade';
proxy_set_header Host $host;
proxy_set_header X-Real-IP $remote_addr;
proxy_set_header X-Forwarded-For $proxy_add_x_forwarded_for;
proxy_set_header X-Forwarded-Proto $scheme;
proxy_cache_bypass $http_upgrade;
proxy_redirect off;
}
location / { # For Next.js app
proxy_pass http://localhost:3000;
proxy_http_version 1.1;
proxy_set_header Upgrade $http_upgrade;
proxy_set_header Connection 'upgrade';
proxy_set_header Host $host;
proxy_set_header X-Real-IP $remote_addr;
proxy_set_header X-Forwarded-For $proxy_add_x_forwarded_for;
proxy_set_header X-Forwarded-Proto $scheme;
proxy_cache_bypass $http_upgrade;
}
}After writing the config, I created a symbolic link:
sudo ln -s /etc/nginx/sites-available/webapps /etc/nginx/sites-enabled/And I removed the default file in /etc/nginx/sites-enabled/.
Then I restarted Nginx to apply the changes:
sudo nginx -t # Test is the config file has no errors
sudo systemctl restart nginxMoving the Apps to the Server
Before installing PM2, I cloned the apps repo into /var/www/:
cd /var/www/
git clone https://github.com/paaggeli/tartarus-insight-rebuild.gitThen I went into each project directory and ran:
# cd /var/www/tartarus-insight-rebuild/nextjs
# cd /var/www/tartarus-insight-rebuild/react-router
npm i
npm run devI ran npm run dev to check for any errors, and then used Ctrl + C to stop the server.
Installing PM2
To install PM2 globally:
npm install pm2 -g
pm2 -vThen, I went into each project, built it, and ran it with PM2.
Next.js
cd /var/www/tartarus-insight-rebuild/nextjs
npm run build
pm2 start npm --name "nextjs-app" -- startReact Router
Since the React Router app will be accessed from http://91.99.146.50/reactrouter, I made some changes to the configuration files before building it. These changes ensure the app handles routing correctly when served from a subpath.
First, I updated the react-router.config.ts file to include a basename that matches the subpath:
// react-router.config.ts
import type { Config } from "@react-router/dev/config";

export default {
  // Config options...
  // Server-side render by default, to enable SPA mode set this to `false`
  ssr: true,
  basename: "/reactrouter",
} satisfies Config;Then, I modified the vite.config.ts file to set the correct base path for the build output:
// vite.config.ts
import { reactRouter } from "@react-router/dev/vite";
import tailwindcss from "@tailwindcss/vite";
import { defineConfig } from "vite";
import tsconfigPaths from "vite-tsconfig-paths";

export default defineConfig({
  base: "/reactrouter/",
  plugins: [tailwindcss(), reactRouter(), tsconfigPaths()],
});With those changes in place, it was time to build the app:
cd /var/www/tartarus-insight-rebuild/react-router
npm pkg set type="module" #specify the type as module in package.json to satisfy ES module requirements for react-router and future versions of Vite. ( https://reactrouter.com/tutorials/quickstart#build-and-run )
npx react-router buildBefore running the React Router app with PM2, I first needed to create a config file named ecosystem.config.cjs, which PM2 uses to start the app. I placed this file in the root of the project.
// ecosystem.config.cjs
module.exports = {
  apps: [
    {
      name: "react-router-app",
      script: "npx",
      args: "react-router-serve build/server/index.js",
      env: {
        PORT: 3001
      }
    }
  ]
};To run the React Router app with PM2, I run the following command
pm2 start ecosystem.config.cjsNow I have my Next.js app to run on http://91.99.146.50 and the React Router app to run on http://91.99.146.50/reactrouter.
Problems I Encounter
I ran into the same issues I had when deploying the apps with Nginx and Docker. Once again, the React Router app worked as expected, but the Next.js app had trouble with Tailwind background image paths. This issue comes from serving the app from a subpath. If I had used a separate domain instead of a subpath, everything would have worked normally.
Conclustion
Self-hosting a React Router or Next.js app is generally straightforward. If you use a tool like Coolify, the process can be just as easy as deploying on Vercel. Even if your VPS provider doesn’t offer a one-click Coolify setup like Hetzner does, there are plenty of tutorials online, and getting it up and running shouldn’t take more than 15–30 minutes.
On the other hand, if you go with manual deployment or Docker, you’ll have a bit more work to do. These methods require more setup, and if you’re not experienced with configuring servers, you might run into a few issues. Especially with Next.js!
That said, I think it’s worth trying to deploy an app manually on a VPS at least once. It’s a great way to understand how things work under the hood and gain valuable experience.
If you’re interested, you can sign up for Hetzner using Coolify’s affiliate link and get €20 in free credit to get started.
Not only will you be learning something new! You’ll also be supporting Coolify, a fantastic open source project that helps make self-hosting simple.
Leave a Reply